In this blog I will show you how simple it is to insert an electrical motor into an Adams View model. Let's use an example of a cordless drill.
You can access the Motor interface from the Machinery tab in Adams View as shown below:
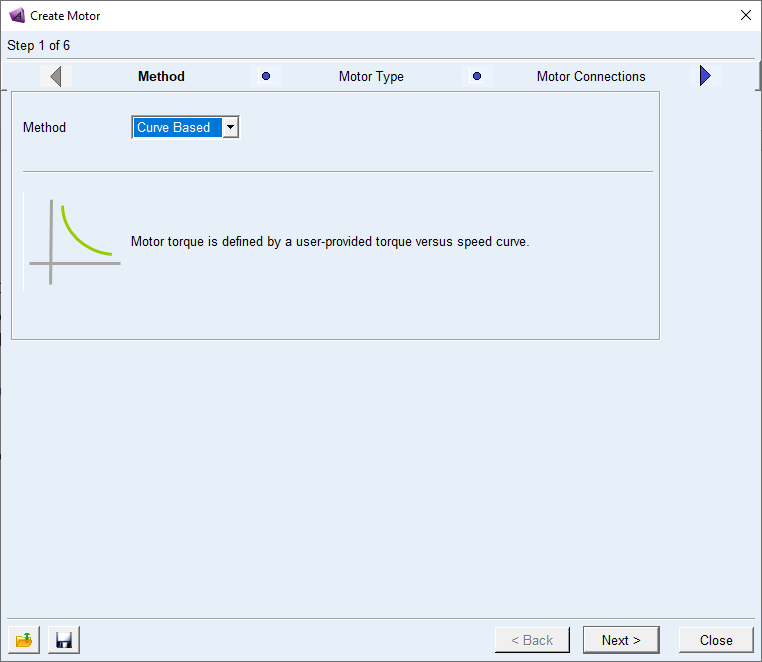
This will open up the Create Motor window:
You start off by selecting how you want to model the motor. This is done by selecting one of the three methods:
Curve Based – You define a torque vs speed curve for the motor.
Analytical – Motor torque is defined using equations in Adams View based on the type of motor that you select.
External – With this method you can define the motor externally in any software that is supported by Adams Controls.
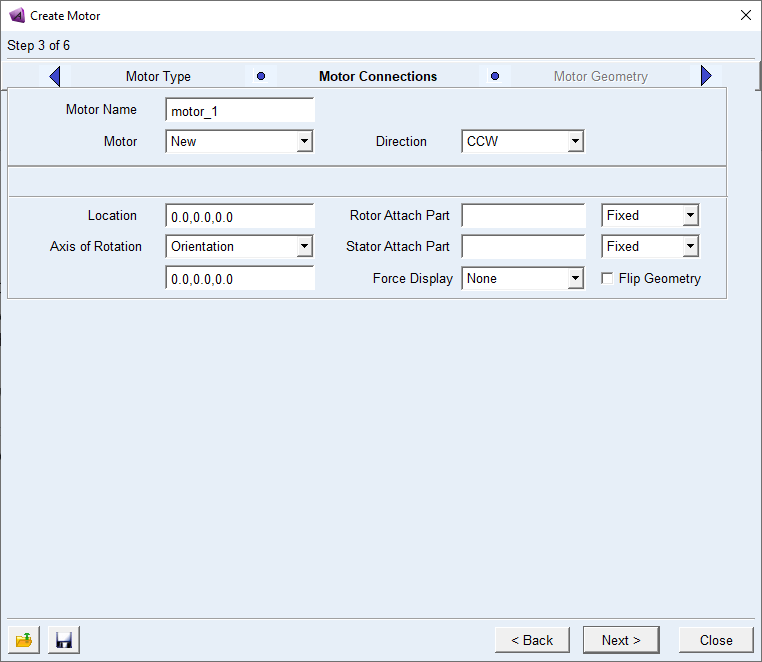
Let's start with the Curve Based method. If you select the Curve Based method, you don’t need to define the Motor Type which is required when using the Analytical method. Instead you continue to the Motor Connections step, as shown below.
In this step you can specify a name for your motor as well as whether it rotates clockwise or counterclockwise. In the Motor drop down menu you will notice three options, you can either define a new motor, replace a motion or replace a torque. This is meant to simplify the placement of the motor for you if you’ve already started to debug your system by driving it with a joint motion or a torque function. If you have existing motions or torques in your model, Adams will give a list from which you can select the motion or torque you want to replace. Once you’ve selected the applicable motion or torque the remaining parameters on this page will auto populate based on the motion or torque’s information.
If you don’t have an existing motion or torque in your model you just select the New option and then you need to define the following parameters:
Location – This defines the front of your motor on the axis of rotation.
Axis of Rotation – here you can define about which axis the motor is rotating.
Rotor and Stator attach parts – Here you define to which parts the rotor and stator will be attaching. You can also select from three attachment types: Fixed, Compliant or None. If you select Compliant, then you can define the connection’s various stiffnesses, while if you select none then no connection will be created.
Force Display – This dropdown gives you the option to select on which component you want to display the force vector.
Flip Geometry – Lets you flip the geometry 180° from its current position.
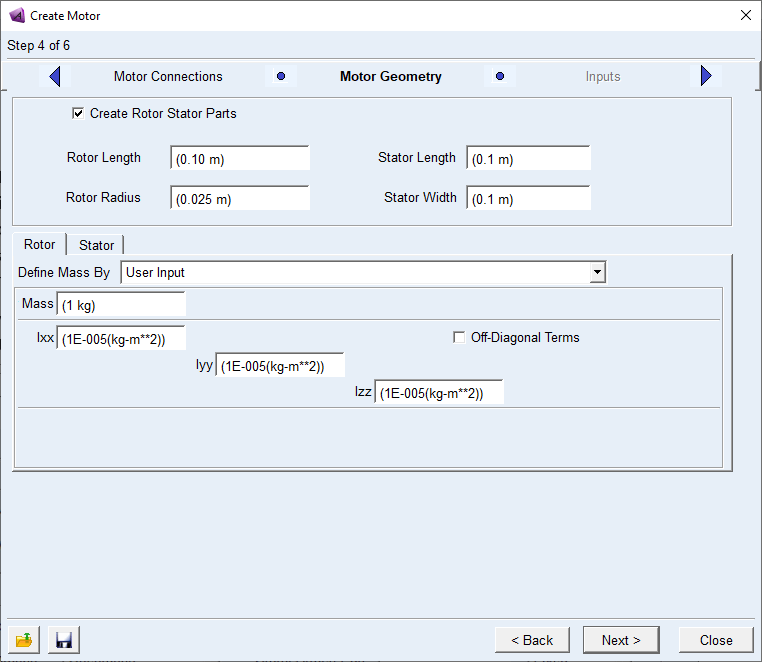
Once you are satisfied with the motor connections, you can move on to the next step, which is the Motor Geometry. The very first option you have is whether or not you want to define the motor geometry. For this example, we will assume that you want to use Adams Machinery to generate the geometry for you, so we leave the tick box checked. The first four options define the rotor’s length and radius as well as the stator’s length and width. These dimensions are used for view purposes as well as if you want to use it to calculate the motor's mass and inertia values.
Once you’ve done this you can define the rotor and stator’s mass and inertia or have it calculated. Remember that if you fixed the rotor or the stator to an existing part that these values will be added to those.
Once you are happy with the motor’s dimensions as well as the mass and inertia properties you can continue to the next step, which is the Inputs step.
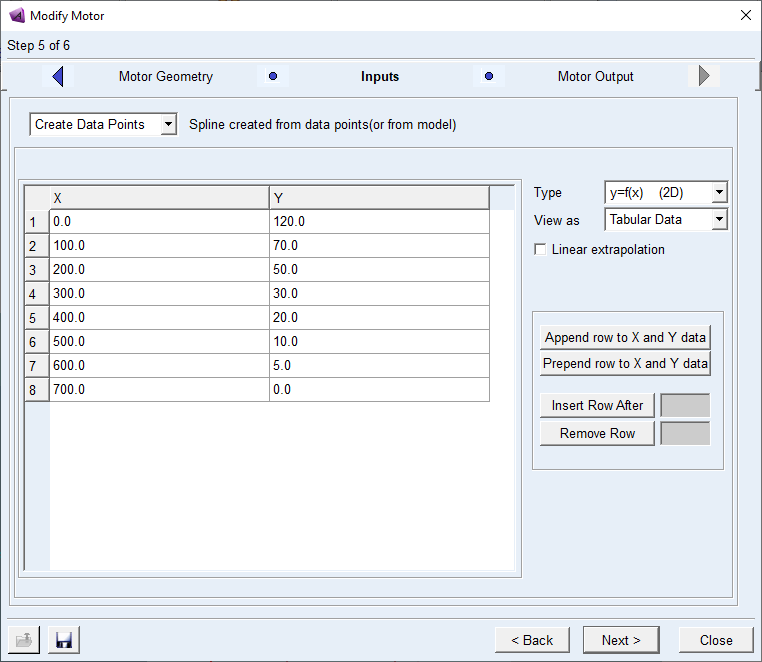
For the Curve Based method this window presents you with three options:
Select Spline – Select a predefined spline of Speed and Torque.
Enter Spline File – Select an external file that contains the Speed vs Torque data.
Create Data Points – This method allows you to manually enter the data points that will be used for the Speed vs Torque spline.
As a check, you can plot the provided data using the 'plot' option:
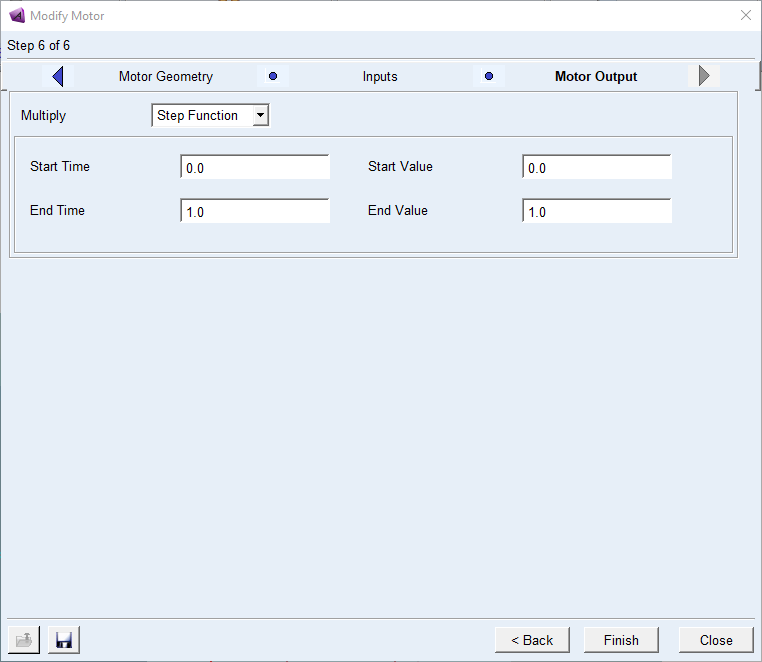
Once you are satisfied with the data, you can continue to the final step, which is the Motor Output.
The Motor Output step lets you define how you want to output the torque from the motor. You can do this by specifying a constant or variable scale factor, defining a step function or define an expression to scale the torque value. The step function is very useful if you want the motor to start up at a certain time and you know how long the start up to full torque takes.
These steps were all for the Curve Based method. However, if you’ve selected the Analytical Method in Step 1, then the steps will be as follows:
Where we passed by Step 2 because there was nothing to select for the Curve Based method, now we need to select a Motor Type for the Analytical Method. The Analytical Method presents you with four motor type options:
AC Synchronous – A motor for which, under a steady state, the rotation of the shaft is synchronized to the frequency of the supply current.
DC – This is a motor that is powered by a DC electric source. Both series and shunt type DC motors can be represented under this option.
Brushless DC – This motor type is a synchronous motor that is powered by a DC power source via an integrated switching power supply, which produces an AC electrical signal to drive it.
Stepper – This motor type is brushless, synchronous electric motor that converts digital pulses into mechanical shaft rotation.
For each of these Motor Types the Motor Connections and the Motor Geometry is defined as it was for the Curve Based method, however each one of these motor types has their own Inputs that need to be specified. It is recommended that you refer to the Adams View help documentation when defining these inputs to better grasp what each of the values does.
Once you've solved your model and you proceed to the post processor, you will notice that Adams has generated the following output requests automatically for you:
Motor Torque (see the image below)
Rotor Angle
Angular Acceleration
Motor RPM
Power
The following video shows how to execute these steps in Adams View:
This blog forms part of the "Sharpen the Saw" series for Adams users. If you would like to ensure your receive notifications of these being published, please subscribe here: https://simteq.co.za/subscriptions/
Don't ever risk your career by using cracked software!
THE EXCUSES: I only used it for my studies, I only wanted to evaluate the software, I didn't use if for commercial purposes, I only installed it, but never used it... Unfortunately, no reason holds up in court for the possession of stolen goods.
THE FINE? The full commercial purchase price of the software (for everything you had access to, whether or not it was even used!)
Students (under- or post-graduate) also has no recourse since they can get access to free legal student versions, or the full commercial versions through their respective universities. If you wish to evaluate any software or module that you do not have access to, please contact us, we will gladly arrange for evaluation licenses, even emergency licenses.
There is just no reason to access illegal software.